
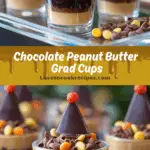
Celebrate academic achievements with these delightful Chocolate Peanut Butter Graduation Caps. These handcrafted treats combine rich dark chocolate with a creamy peanut butter fudge filling, topped with a decorative tassel, making them a perfect addition to any graduation celebration.
Why You’ll Love This Recipe
These graduation caps are more than just visually appealing; they offer a delectable combination of flavors and textures. The smooth, rich chocolate complements the creamy peanut butter center, creating a treat that’s both festive and indulgent. They’re an excellent way to add a personal touch to graduation parties, offering guests a memorable and delicious experience.
Ingredients
(Tip: You can find the complete list of ingredients and their measurements in the recipe card below.)
- 16 ounces of pure, melted and tempered dark chocolate (or dark confectionery coating)
- 2 ounces of white chocolate chips (approximately 5 tablespoons)
- 1 ounce of peanut butter chips (approximately 2½ tablespoons)
- A pinch of table salt
- 3 ounces of creamy peanut butter (approximately 5 tablespoons)
- 3 ounces of white modeling chocolate (candy clay)
Directions
- Prepare the Chocolate Shells: Using a silicone half-sphere mold or a peanut butter cup mold, coat the cavities with a thin layer of melted dark chocolate. Allow the chocolate to set by chilling in the refrigerator for a few minutes.
- Make the Peanut Butter Filling: In a microwave-safe bowl, combine the white chocolate chips and peanut butter chips. Microwave in 30-second intervals, stirring after each, until melted and smooth. Stir in the salt and creamy peanut butter until well combined. Let the mixture cool for about 10 minutes.
- Fill the Chocolate Shells: Transfer the peanut butter mixture into a disposable pastry bag or squeeze bottle. Pipe the filling into the chocolate shells, leaving about 1/16 to 1/8 inch of space at the top. Allow the filling to firm up.
- Seal the Cups: Cover the filling with a thin layer of melted dark chocolate, ensuring the filling is completely sealed. Let the chocolate harden, then carefully remove the cups from the mold.
- Create the Graduation Cap Tops: Spread the remaining melted chocolate onto a silicone mat or parchment paper to about 1/8 inch thickness. Allow it to set until it’s firm yet still pliable. Using a square cookie cutter (approximately 2 inches), cut out squares to serve as the mortarboards.
- Assemble the Caps: Attach each chocolate square to the top of a peanut butter cup using a dab of melted chocolate. Allow them to set.
- Add the Tassels: Use a clay extruder fitted with a multi-hole disc to press out strands of white modeling chocolate. Cut the strands into 1½-inch lengths and pinch one end together. Attach the pinched end to the center of the chocolate square using a small amount of melted chocolate. Roll a small ball of modeling chocolate and place it over the pinched end to complete the tassel.
Servings and Timing
- Yield: Approximately 15 graduation cap treats
- Preparation Time: 1 hour and 15 minutes
- Cooking Time: 2 minutes
- Total Time: 1 hour and 17 minutes
Variations
- Flavor Twists: Substitute the peanut butter filling with almond butter or hazelnut spread for a different flavor profile.
- Colorful Tassels: Use colored modeling chocolate or edible glitter to match school colors or party themes.
- Simplified Version: For a quicker version, use store-bought peanut butter cups and chocolate squares, assembling them with frosting and candy tassels.
Storage/Reheating
- Storage: Store the graduation caps in an airtight container at room temperature for up to one week.
- Refrigeration: If your environment is warm, refrigerate the treats to prevent melting. Bring them to room temperature before serving.
- Freezing: These treats can be frozen for up to a month. Thaw in the refrigerator overnight before serving.
FAQs
What type of chocolate is best for this recipe?
Using high-quality dark chocolate with a cocoa content of 60-70% is recommended for a rich flavor. If you prefer a sweeter taste, milk chocolate can be used as a substitute.
Can I use natural peanut butter for the filling?
Natural peanut butter can be used, but it may result in a slightly different texture. Ensure it’s well-stirred to prevent oil separation.
How can I make the tassels without a clay extruder?
If you don’t have a clay extruder, you can roll thin strands of modeling chocolate by hand or use a garlic press as an alternative tool.
Are there nut-free alternatives for this recipe?
Yes, you can use sunflower seed butter or soy nut butter as a substitute for peanut butter to make the recipe nut-free.
Can I make these treats in advance?
Absolutely. These graduation caps can be made up to a week in advance and stored in an airtight container until ready to serve.
How do I prevent the chocolate from blooming?
Ensure the chocolate is properly tempered and stored in a cool, dry place away from humidity to prevent blooming.
Can I add decorations to the caps?
Yes, you can personalize the caps with edible markers, sprinkles, or colored modeling chocolate to match the graduate’s school colors.
Is it necessary to temper the chocolate?
Tempering the chocolate ensures a glossy finish and a firm snap. While not mandatory, it enhances the overall appearance and texture of the treats.
What can I use if I don’t have a silicone mold?
If a silicone mold isn’t available, mini muffin tins lined with paper cups can serve as an alternative for shaping the chocolate shells.
How do I ensure the chocolate squares don’t crack when cutting?
Allow the chocolate to set until it’s firm yet still pliable before cutting. Using a warm knife can also help achieve clean cuts without cracking.
Conclusion
These Chocolate Peanut Butter Graduation Caps are a delightful way to honor the accomplishments of graduates. Combining rich flavors with a festive presentation, they are sure to be a hit at any celebration. Whether you’re hosting a party or looking for a thoughtful homemade gift, these treats offer a perfect blend of taste and creativity.
Print
Chocolate Peanut Butter Grad Cups
- Prep Time: 20 minutes
- Cook Time: 0 minutes
- Total Time: 50 minutes (including chilling)
- Yield: 24 mini cups 1x
- Category: Dessert
- Method: No-bake
- Cuisine: American
Description
Chocolate Peanut Butter Grad Cups are layered, bite-sized treats that combine creamy peanut butter, rich chocolate, and festive graduation toppers. These no-bake dessert cups are perfect for party trays or individual servings at a celebration table. Keywords: chocolate peanut butter cups, no-bake grad desserts, mini graduation treats, peanut butter cups, party sweets
Ingredients
- 1 cup creamy peanut butter
- 1/4 cup unsalted butter, melted
- 1/2 cup powdered sugar
- 1/2 tsp vanilla extract
- 1 1/2 cups semi-sweet chocolate chips
- 1 tbsp coconut oil or shortening (optional, for smoother chocolate)
- Mini cupcake liners or silicone molds
- Graduation-themed candy toppers or printable picks
Instructions
- Line a mini muffin tin with cupcake liners or prep silicone molds.
- In a bowl, mix peanut butter, melted butter, powdered sugar, and vanilla until smooth.
- Scoop 1–2 teaspoons of the peanut butter mixture into each liner and flatten.
- Freeze for 15–20 minutes to set.
- Meanwhile, melt chocolate chips with coconut oil (if using) in a microwave-safe bowl in 30-second intervals, stirring until smooth.
- Spoon melted chocolate over each peanut butter layer, smoothing the tops.
- Chill until chocolate is firm (about 20–30 minutes).
- Decorate with graduation-themed toppers before serving.
Notes
- Use silicone molds for a cleaner release.
- These can be made several days in advance and stored in the refrigerator.
- For a crunchier twist, mix in crushed graham crackers or crispy rice cereal into the peanut butter layer.
Nutrition
- Calories: 140
- Sugar: 9g
- Sodium: 60mg
- Fat: 10g
- Saturated Fat: 4g
- Unsaturated Fat: 5g
- Trans Fat: 0g
- Carbohydrates: 11g
- Fiber: 1g
- Protein: 3g
- Cholesterol: 2mg
Your email address will not be published. Required fields are marked *